
Fastest ever Laravel deployments via GitHub? You decide.
Laravel is a much-loved, free PHP framework for developing web applications. Using expressive and elegant syntax, Laravel makes developers’ lives easier by streamlining common tasks.
Now, the best way to round off a satisfying coding session without killing your creative spark is a ridiculously fast and simple deployment experience for testing and production.
Sound like something you could get on board with? Then this tutorial is for you. If you prefer video content, you can find a video tutorial for setting up a Laravel project below.
What you need to get started
- An existing Laravel app in a GitHub repository. If you just want to see how everything works first before using your own projects, you can clone our starter repo or create an example app from the command line.
- A Deploy Now account with a PHP Project. More on this soon.
Side note: It makes sense to check and test commits to your app on a local machine first before pushing it to the repo. For this, Laravel recommends Sail, a light-weight CLI to start Laravel apps and side-containers (database, mail server, etc.) within a local docker installation.
Deploy Now and GitHub Actions – a match made in heaven
Deploy Now is a build tool created by developers for developers, bringing together modern Git workflows and IONOS infrastructure. Combined with the power of GitHub Actions, you can now implement projects faster than ever – and save yourself the trouble of integrating and automating workflows yourself (or sifting through Stack Overflow tutorials).
GitHub Actions automates, customises, and executes software deployment workflows right in the repository, making it the perfect link between the worlds of hosting and software development.
Deploy Now’s setup assistant makes it possible to launch new projects in seconds, literally. Upfront scans of GitHub repositories collect data to intelligently produce out-of-the box configurations with tons of pre-filled data.
The 4 steps to a next-level deployment experience
- Sign up for Deploy Now and link it with your GitHub account. Deploy Now will need access to the GitHub repository that you want to deploy from.
- Review build steps: Deploy Now should automatically detect Laravel in your chosen repository (Step 1) and propose suitable build steps – most likely Composer and Node.js. You can review and customise these steps to your liking.
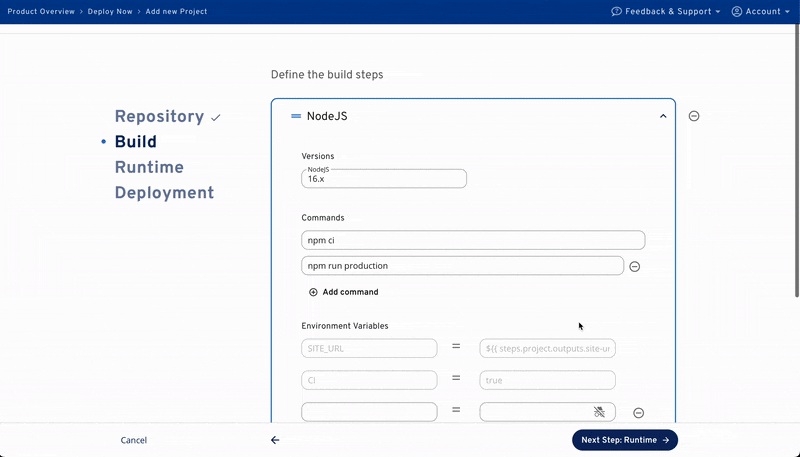
You can also review or customise the GitHub Actions workflow later on. For this, open the deploy-now.yaml file in .github/workflows.
- Select a PHP version and template your config file. Deploy Now provides you with a set of environment variables for the MariaDB server that you can reference in your config file. To access the database in your Laravel App, add this block to your config file:
DB_HOST={{.runtime.db.host}}
DB_DATABASE={{.runtime.db.name}}
DB_USERNAME="{{.runtime.db.user}}"
DB_PASSWORD="{{.runtime.db.password}}"
There’s also the option of storing private environment variables in GitHub secrets and reference them directly in your config file via {{.secrets.variable-name}}. During the deployment process, Deploy Now then swaps the placeholders with the actual values stored in GitHub secrets.
- Define file persistence and repeating runtime commands: you wouldn’t want to overwrite all your server files on every deployment. To do that, you can define paths as excludes, so that they don’t get replaced. Remote commands are executed before or after the new deployment.
Finally, check all the settings you have made and click on ‘create project’. You’ll be redirected to the project detail page while your app is being built and deployed in the background. Navigate to the GitHub Actions build logs to monitor its progress.
There you have it! After the deployment, your Laravel App should be running smoothly, waiting for your next git push. Deploy Now hosts your apps on 100% green Apache web servers, with up-to-date PHP versions and a DDoS shield.
What about schedulers, queues and cron jobs?
Once setup is done, all deployment and runtime settings will be stored in the .deploy-now folder of your repo. Configuration files exist as .templates. The config.yaml contains excludes and remote commands but also allows you to define cron jobs.
You can simply add blocks using standard Linux cron job syntax under cron-jobs:
E.g. run a job every day at 5am
0 5 * * * <command-to-execute>If you’re using the Laravel Scheduler, your Laravel app already lists all commands to be executed on a regular schedule. In this case, you just add the following cron entry:
/path-to-your-project && php artisan schedule:run >> /dev/null 2>&1
schedule: * * * * *
The Deploy Now platform is not designed for continuously running background processes. To use Laravel Queues, we recommend running your queue with
\Artisan::call('queue:restart') and \Artisan::call('queue:work --daemon') repeatedly in a cron entry.
Which interfaces will I work with going forward?
- GitHub – managing your code, customising the workflow (optional) and checking build logs
- Deployment viewer – checking the files on your runtime including server logs
- phpMyAdmin – managing your database
You can access all of these directly from the Deploy Now dashboard. Handy.
We hope you discovered a much quicker and more satisfying way of deploying Laravel apps with this tutorial – especially if you're in it for the love of code, not repeating mundane tasks.
See you soon.
